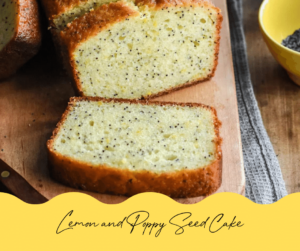
This Lemon and Poppy Seed cake is a delicious addition to afternoon tea! We have a fabulous number of lemon trees at Vineyard Cottages and of course they all ripen around the same time. We zest, juice, peel and dehydrate lots through the winter to save for the summer months. Lemon cake is always a family favourite in our house and this is a great way to use up the pots of yoghurt left over from breakfast.
Felicity O’Driscoll from the brilliant Auckland book store Cook The Books recently posted a fabulous lemon cake recipe on the ever popular Lazy Susan Facebook Page. There are so many varieties and options for great lemon cake but when I first cake to NZ I was introduced to lemon and poppy seed as a combo and I have been in love with this since.
Top tip! If you soak the poppy seeds in milk or lemon juice and water it really brings out the flavour and softens the outer casings. The poppy seeds give a subtle pepper flavour to the cake which may sound weird but it really enhances the flavour of the lemon
1/4 cup
Milk
4 Tbsp
Poppy Seeds
Rind of 2
Lemons
200g
Butter
3
Fresh eggs
3/4 cup
Caster sugar
2 1/4 cups
Plain flour
2 tsp
Baking powder
1/2 cup (125ml)
Sour Cream or yoghurt
Preheat oven to 180 degrees. Grease a 25cm ring pan or loaf pan and line the base with paper.
Soak the poppy seeds in the milk for a min of 10 minutes and up to an hour.
Beat the softened butter, 3 tablespoon lemon rind and sugar until pale and creamy. Add the eggs, one at a time beating well after each addition.
Sift the flour and baking powder into another bowl. Add flour to the butter mixture in two batches, along with the sour cream or yoghurt, poppy seeds and milk.
Spoon the cake mixture into the prepared pan. Bake for 45 to 50 minutes or until a skewer inserted in the centre comes out clean.
If you want to add an additional lemon zing, while cooking the cake make a lemon syrup. Combining the 1/4 cup of lemon juice, 1/4 cup of sugar and 1/4 cup of water in a saucepan. Stir over a low heat until the sugar has dissolved and simmer for 5 minutes. Add any remaining lemon zest. Spoon the hot syrup over the cake as soon as it comes out of the oven (use a skewer to poke holes for the syrup to soak into). Leave in the pan to cool. This isn’t essential. We love it without syrup, but it does all a little extra to an already delicious cake.
Serving options:
Best served with yoghurt or creme fraiche.
Lovely in the summer with raspberry or strawberry ice cream or mango sorbet.
Makes lovely muffins. Pour half into a lined muffin tin, add a dollop of cream cheese and add the rest of the mix.
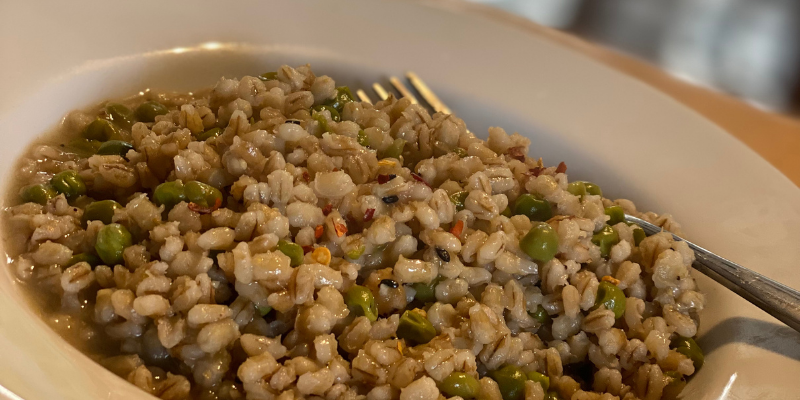
Farro is an ancient grain packed full of nutrients. It is high in protein (always a tick in the box) fibre and antioxidants. Years ago I was introduced to it when I was working with Sabato and it’s been a staple in our cupboards ever since. Even Nigella gave it the thumbs up in Nigelissima where her recipe for farro risotto had everyone ditching the rice for a while and swapping to this fabulous grain.
I use it a lot for salads in the summer and as a base for using up ingredients in the fridge. Last week I had a pot of ricotta to finish up, some lemons, peas and a jug of chicken stock. With a gale blowing outside the window it was the perfect required lunch! This Smoked Chilli Farro Risotto is a delicious winter warmer packed full of protein and nutrients and is perfect for a crowd.
Farro doesn’t melt together like arborio rice. It will go creamy like porridge if cooked long and slow but I quite like the almost chewy texture before that stage. Experiment as you will!
Rinse the farro in warm water and soak while you prep the other ingredients.
Bring the stock to boil and lower to a gentle simmer.
in a sauté pan or deep frying pan, sauté the onion and garlic in olive oil until soft and golden
Drain the farro grains and add to the onions and garlic. Stir to heat through and combine. Add the wine / sherry and stock and cover with a lid or foil. Simmer for 30 mins on low stirring occasionally. Stir in the zest, peas and chilli flakes and season to taste.
Crumble in the ricotta and turn the heat off. Leave to rest for a min and serve. I usually add a touch more chilli, a good drizzle of olive oil and some chopped parsley to serve. Of course this dish would be perfect with a pile of parmesan sprinkled on top – but I’d eaten it all!
Double and quadruple the Smoked Chilli Farro Risotto to feed the masses!
We have served this for our conference guests and it is always a winner! Try it, add chicken or salmon, any vegetables you like and definitely parmesan!
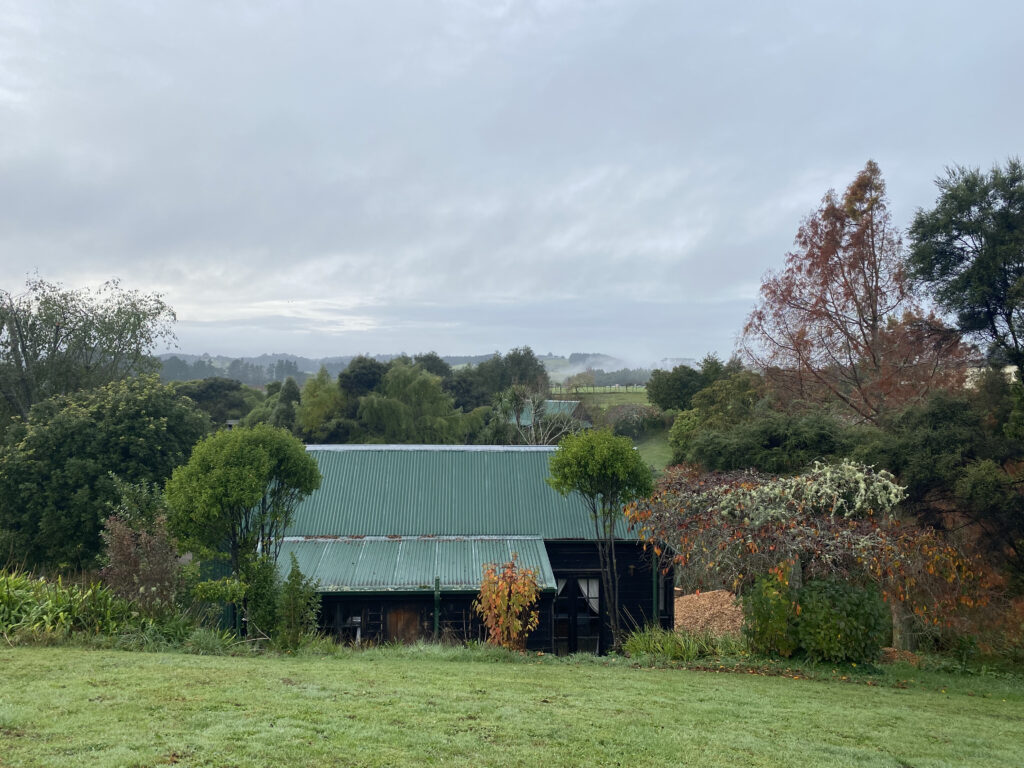
Over the last couple of days, some of our big trees came down, creating new horizons. If you have stayed with us at Vineyard Cottages, you will know just how lucky we are to have so many stunning native and European trees throughout the property. A friend’s husband who is a professional arborist, came out when we took over the property and was in awe of the variety of trees we had in our charge. One Saturday morning we went around the grounds with note books in hands and he named each and every tree, shrub and plant. There were over 50.
I struggled and struggled when it came to having some of the big guys removed. For years they have towered above the cottages, providing shade in the summer, blossoms in the spring, amazing colour in the autumn and stark contrast in the winter. But it was time to say goodbye to some and prune others to allow new growth to flourish. Luckily we have a great local team of arborists on hand who rolled in early on Wednesday morning and got to work creating space. It was goodbye to the huge lilly pilly (monkey apple) next to Sauvignon Blanc Cottage which had grown so large it cut most of the light out in the corner of the drive. Once it was down, we could see to the back fence line and the collection of native trees that runs along the creak. The property instantly felt longer and more open and as hard as it was to see it down, the creation of so much space is wonderful.
The hardest tree to say goodbye to was the large Ash in the middle next to the plum trees. Over the last few years it has cracked and dropped its limbs on the driveway. The moment the first rains came after long bouts of heat in the summer, cracks would appear in the branches. The glorious carpet of leaves it would drop on the drive was the real signal winter was on its way, but I was beginning to get nervous about it causing damage. It was time to go. This morning I was in the vineyard with the dogs and looked out across the roof of Sauvignon Blanc to discover a whole view I had not scene before. It had been hidden behind the beautiful ash tree, but without it, we can see for miles and miles. So while I worried about losing the big guys, we have been able to give a whole load of little trees room to grow and we can see fabulous new horizons. I think there is a lesson to be learnt in that!
View from the top
So if you’ve been thinking about coming to stay, nows the time! The winter special is on. Book two nights and stay for three!
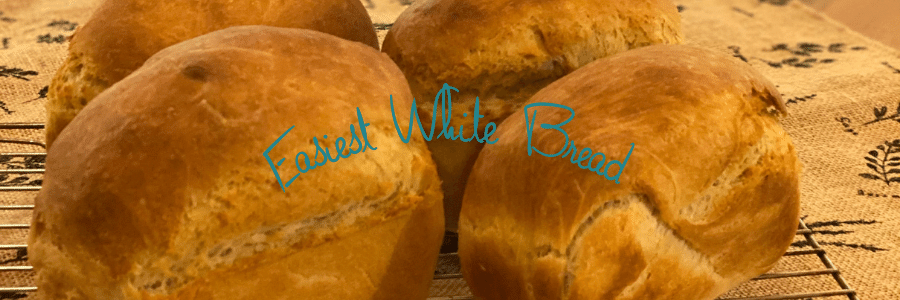
This is the recipe for the easiest loaf of bread you will ever need to make! You’re welcome.
Before Covid19 pulled everyone back into the kitchen, many people were terrified of making bread. Generations ago, a loaf of bread might have been made daily as a staple task to feed a family. In 2020, we all rediscovered the pleasure of creating a simple loaf. At Vineyard Cottages, this recipe kept us baking throughout the Level four lockdown. While the government kept reiterating there was no shortage of bread and we shouldn’t be panic buying flour, I ordered way too much from the cash and carry and dished it out to family and friends in zip lock bags via our letter box.
This is the easiest loaf to get your bread confidence bubbling. It is a plain white loaf, not a complex sourdough or raw grainy anything. The white bread police will not like it – who cares!
The biggest tip I can give you is, get really good quality flour, it makes a difference. And be patient, don’t rush the process.
Preheat the oven to 180
Ingredients
1KG Strong White Flour
650ml luke warm water
21g instant yeast
1tablespoon sugar or honey
2 teaspoons of salt.
1 tablespoon of olive oil
I use a Kitchen Aid and dough hook for making bread. It speeds things up and on days when I’m racing around, it’s a cleaner process. But during lockdown I get stuck in with my hands and allow the monotonous motions of kneading as a way of winding my brain down.
Add all of the dry ingredients into a large mixing bowl and turn to combine. If you are using honey dilute in the water, or add the sugar to the dry mix. Using a dough hook mix all of the ingredients together. Either knead by hand or in the bowl until the dough is smooth, pliable and soft. Place the dough in an oiled bowl. Cover with a damp towel or plastic wrap and pop in a draft free warm spot. The airing cupboard is perfect!
Once the dough has doubled in height gently knock the air out of it and place in a floured loaf tin or on a baking sheet to prove for another 20-30 mins.
I always add a ramekin of hot water into the oven to create some steam. This helps the crust to crisp up and gives an even colouring.
Put the loaf in the middle of the oven. Bake times with vary between 30 & 40 mins.
A great baker once told me that his dough changes every day depending on the weather. Some days it cooked faster, some days slower and always took a little courage to know when to take out of the oven. From his wise words I learnt to leave the bread a few mins longer than I initially thought to take out of the oven. You know when it’s ready, when you tap the loaf and it sounds hollow.
Try and leave to rest and cool before cutting a slice and slathering in butter! It’s hard, but worth it!
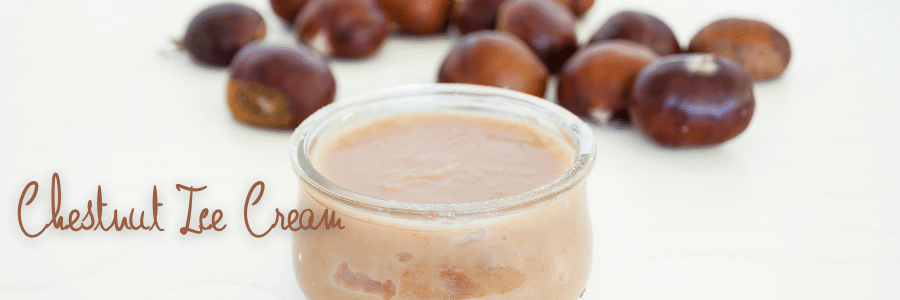
This recipe for Sweet Chestnut Ice cream was sent to me by one of our fabulous Spanish wwoofers. Racquel claimed to be terrible in the kitchen, but turned out many delicious dinners for us to share. One of our favourites was a tuna empanada pie with a yeast dough. I could have eaten all of it from the tin!
On another occasion she made croquettes from our left over beef casserole, with the direction from her mum in Galicia. Oh how we missed her when she left amongst the chaos of Covid in 2020.
As we head into the depths of Autumn, I looked up the recipes she sent me from Spain when she returned to her family. It was autumn in Spain and they were harvesting chestnuts in her region. One of the joys of having people share our home is the sharing of family recipes. This has become one of my favourites.
This was the recipe she sent for Sweet Chestnut Ice Cream:
Ingredients:
500g chestnuts.
400ml milk cream.
2egg whites.
150g sugar.
2 tablespoons of icing sugar.
Instructions:
1.-Cook the chestnuts (without the first lay) in water for 15 min.
2.-Drain and put in a bowl.
3.-Add 150 ml of milk cream and mix until make puree.
4.-Put the sugar in a saucepan, add 50ml of water and cook until make syrup.
5.- Add the syrup to the puree and mix.
6.-Let cool.
7.-Assemble the remaining milk cream.
8.-Add the icing sugar to the milk cream assembled and mix.
9.-Also assemble the egg whites.
10.-Slowly mix the chestnut puree with the assembled cream and the whites.
11.-Put in the freezer 45min.
12.-“Beat” with the electric mixer and return to the freezer 30min more.
13.-“Beat” again.
14.-Keep in the freezer at least 4 hours.
15.-“Beat” before serving. (You can add a few small pieces of chestnut to the mixture before putting in the freezer for the first time)
I’m looking forward to this on a rich chocolate cake later on this evening!
If you’re a sweet chestnut fan, check out our chestnut pesto recipe.