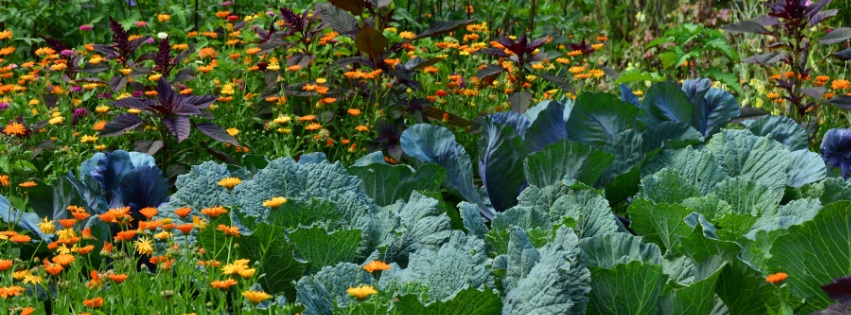
+64 (9) 4118248 / 022 492 4017 info@vineyardcottages.co.nz
From Spain, Sweet Chestnut Ice Cream

From Spain, Sweet Chestnut Ice Cream

This recipe for Sweet Chestnut Ice cream was sent to me by one of our fabulous Spanish wwoofers. Racquel claimed to be terrible in the kitchen, but turned out many delicious dinners for us to share. One of our favourites was a tuna empanada pie with a yeast dough. I could have eaten all of it from the tin!

On another occasion she made croquettes from our left over beef casserole, with the direction from her mum in Galicia. Oh how we missed her when she left amongst the chaos of Covid in 2020.

As we head into the depths of Autumn, I looked up the recipes she sent me from Spain when she returned to her family. It was autumn in Spain and they were harvesting chestnuts in her region. One of the joys of having people share our home is the sharing of family recipes. This has become one of my favourites.

This was the recipe she sent for Sweet Chestnut Ice Cream:

Ingredients: 

500g chestnuts. 

400ml milk cream. 

2egg whites. 

150g sugar. 

2 tablespoons of icing sugar. 

Instructions: 

1.-Cook the chestnuts (without the first lay) in water for 15 min. 

2.-Drain and put in a bowl. 

3.-Add 150 ml of milk cream and mix until make  puree. 

4.-Put the sugar in a saucepan, add 50ml of water and cook until make syrup. 

5.- Add the syrup to the puree and mix. 

6.-Let cool. 

7.-Assemble the remaining milk cream. 

8.-Add the icing sugar to the milk cream assembled and mix. 

9.-Also assemble the egg whites. 

10.-Slowly mix the chestnut puree with the assembled cream and the whites. 

11.-Put in the freezer 45min. 

12.-“Beat” with the electric mixer and return to the freezer 30min more. 

13.-“Beat” again. 

14.-Keep in the freezer at least 4 hours. 

15.-“Beat” before serving. (You can add a few small pieces of chestnut to the mixture before putting in the freezer for the first time)

I’m looking forward to this on a rich chocolate cake later on this evening!

If you’re a sweet chestnut fan, check out our chestnut pesto recipe.

Easy Autumn Chestnut Pesto

Easy Autumn Chestnut Pesto

Every year our one tree gives us about a kilo of chestnuts. I start off loving them and by the end of the kilo, I’m over it. 

This year after the first pick I decided to try them in a pesto. We have lots of garlic, Olive Oil and herbs all produced here, so as far as cheap and easy eats go, this was one of the best. Pesto is a staple in our fridge. Whether it’s one of the delicious Sabato made pestos or one we have made at home, it is an quick add to a meal to jazz it up.

The most important thing is to make sure the chestnuts are roasted properly and that all your digits are in place after you score through the outer casing of the nut. If you don’t cross the top of them, you will end up with an exploding chestnut in the oven and a huge mess. They also turn into little nuclear bombs likely to inflict pain by bursting on you.

Carefully cross the top of the chestnut with a sharp knife and your wits about you. The cross needs to be long enough that you can easily pull the shell off the chestnut once roasted. If it’s not, it can more fiddly than necessary. Roast in a hot oven until you can smell them and the shells have began to curl away. Whatever you do, let them cool!

I used a handful of the best herbs I could find which included parsley, oregano, chives and thyme. I also added some silverbeet for depth and colour and of course lots of vitamins and minerals and to smuggle green vegetables into my husband. The end result a delicious creamy garlic chestnut pesto!

Pesto

150g roasted and peeled chestnuts

3 cloves of peeled garlic

One cup of washed and finely chopped herbs and greens

1/4 cup hard cheese. (I used Grana as we didn’t have any Parmesan – WHAT!)

Salt

Good Quality Olive Oil about half a cup

Start with a big pestle and mortar. Bash the garlic with some olive oil and salt into a smooth paste. Chop the chestnuts into smaller pieces and bash around in the garlic mix. 

Grate or finely chop the cheese – I prefer the adventure of getting a larger chunk of cheese in a good pesto, so just roughly chopped and bashed in the pestle. 

Chop the herbs and greens down to a manageable size and add to the mix. 

Keep adding the olive oil bit by bit and season to taste at the end. Depending on how you like your pesto, add oil to suit. 

You can of course make this in a processor, it would just be smoother.

Rough chop pasta. 

I’ve been making us a pasta dish once a week and this is a really simple one when you have little time. 

100g 00 flour

1 fresh as possible egg. 

On a clean smooth surface make a mountain with the flour and turn it into a volcano by making a big whole in the middle to add the egg. Mix the egg into the flour.  I start using a fork and bring the flour into the egg initially and then get stuck in with my hands. Kneed the pasta into a smooth pliable dough and leave to rest under a bowl for at least 30 mins. 

Depending on the humidity and the temperature, you might need a little olive oil in the dough. I don’t use water though.

Once the pasta has rested flour your surface and rolling pin and roll out. You can use a machine – I have given up as it ends up taking much more time unless you are wanting to create an even spaghetti or tagliatelle. 

Roll the dough turning regularly, lightly flouring as you go if needed. To get a thinner pasta (this takes practise) roll the dough around the rolling pin, making sure there is sufficient flour to stop it sticking and roll the layers together. It provides a very even sheet of pasta. This was about 2 mm thick by the time I finished

Fold in half and in half again and chop into strands. Gently open up with your fingers and pop into salted boiling water. 

It will take minutes to cook. 

Drain, catching the last few drops of the cooking water in the saucepan. Add back the pasta and chestnut pesto and turn to combine. 

Two things : 

1. If you haven’t discovered Pasta Grannies on Facebook, you need to. Just watching their intuitive handling of the dough has been a wonderful learning experience.

2. This is a really rough recipe and it worked for this garlic loving household. Experiment and make it work for you. It’s I’d had my way I would have added chilli to the chestnut pesto, but the husband said no!

If you are a fan of chestnuts, check out this delicious ice cream recipe

Spring Time Chicken and Mint Salad

Orange Sour Cream Cake

Chicken and Mint Salad


I’ve got a garden full of mint which for some people is a curse, but for us, it is definitely a blessing. I love fresh mint tea, we use mint in all our water bottles for events, mint syrups, mint in hot chocolate, mint in cooking, you name it, if I can use it, I do. There is also always a roast chicken cooked in the house once a week. When there are a number of mouths to feed around the table and sandwiches that need filling, cooked chicken is quick and easy. Nothing gets wasted. The bones are made into stock with any vegetable peelings and the animals get all the stock scraps once it is cooked. In fact I think Archie’s favourite thing in the world is a carrot from the stock pot! This is a great throw together salad where you can add and take away any flavours you want apart from the mint and chicken. If you have tahini in the fridge it’s the perfect dressing.

 Ingredients.

    • 200g Roast chicken
    • 1/2 cup washed mint finally chopped
    • 1/2 cup chopped parsley
    • 1 cup chopped cucumber
    • 1 cup shredded lettuce
    • 2 raddishes finely sliced
    • 1 spring onion finely chopped
    • handful toasted nuts or seeds – I love toasted hazlenuts and pumpkin seeds. 

Wash all the fresh salad ingredients, dry and add to your salad bowl. Top with the chicken and toasted nuts and seeds. Mix with Tahini dressing.

If you want to go one step further with this add it to a pita pocket as an easy chicken salad lunch. 

Tahini dressing is one of these really easy sauces you can add onto anything. There are varying ways of making a tahini sauce but mine is simply

  • 1–2 garlic cloves
  • 1/2 tsp salt
  • 3/4 cup tahini past
  • 1/2 cup freshly squeezed lime or lemon juice
  • 1/4 cup cold water, more if needed
  • 1 cup fresh chopped parsley leaves

Blitz it all together in a blender or pestle and mortar. Will keep for up to 5 days in the fridge. 


Getting in the Spring of it

Getting in the Spring of it

It’s been a lovely spring so far. The blossoms are absolutely magnificent and the grounds have burst back into life in all different shades of bright green. I was away on food tours around the country for most of last week and when I came back there were leaves on all the grape vines and the maples have burst back into life. 

Of course there are aways a few little jobs you look at and think “Damn, should have pruned that over winter!” but all in all we’re looking forward to a pumper crop of everything this year! The weekend weather has bee very kind to us and our German and American teams have been busy in the garden. The compost turned from useful to inhabited over winter. Endless weedy climbers took hold and the team ripped them all away this morning to find some gorgeous rich fertile soils to use underneath. We’re planting out the little vegetable garden. For a small space, it feeds us and the cottages well throughout the summer and autumn. I’m a huge companion and square foot gardener. If there is something growing down, we’ll have something growing up as well. Years ago, some food tour guests introduced this method to me. They were from Canada where the seasons were brutal and short and there little 3x3m garden was packed full of all kinds of vegetables. It was one of those Big Foody tours where I probably learnt more on the day than they did and I’ll be forever grateful they introduced me to this concentrated gardening method.

Today we’re prepping all the beds, digging in the compost, ash, coffee grinds and worm farm juice. Then we’ll pack the beds with veggies growing down and finish off with the veggies growing up. For example radishes grow down and peas grow up, so we’ll plant the radishes beneath the peas usually with some lettuces in there for good measure too. This works well with really good nourishing soil which we are so lucky to have in this area. The comfrey leaves are about to be wilted, chopped and dug deep into the soil beneath the tomatoes. The potassium in the herb is great for the big feeders like tomatoes. 

With a house full during the summer we eat lots of salad so making sure we have great lettuces, rocket, kale, radishes and herbs is vital We plant a dozen lettuce to begin and add more and more every month as we get busier. I love the radish leaves with french dressing so there are always lots of those! 

The dogs are never happier than when they are with people in the garden and in Nora’s case, helping digging holes!

Come and stay soon!

Elle